Showing posts with label Graphic. Show all posts

Apr 16, 2019

Mobile Intel(R) 915GM/GMS,910GML Driver For Windows 7

Update on Aril 17 2019 :

GRAPHIC:
Mobile Intel(R) 915GM/GMS,910GML Express Chipset Family For Windows 7
Download Link: (last update on Jan 30 2013)
Download (recommended)
Download (mirror)

Note : You can use your original Windows XP or Windows Vista driver. Direct Installation will failed so you need to install base on the installation method described below.

Update:
Microsoft officially announced they no longer continue support for this product and they provide the last XPDM driver on their website. You can also use that driver to install.

INSTALLATION:

First install directly by extracting the driver, and run the igxpun.exe. It will prompt some components are corrupted but you will have maximum resolution after the installation.


IF FAILED??

If failed we need to install it manually:

1. Extract the driver and remember the extracted folder path. We will need it later.
2. Now open device manager by click start and on the search box type DEVMGMT.MSC


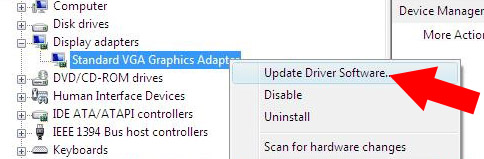
3. Device manager will open, right click on standard VGA and select update driver.


4. Select Browse my computer for driver Software.


5. Select Let me pick from a list of device driver from my computer.


6. Select Have disk and point to the driver we extracted earlier and select the igxp32.inf file.

7. Continue with on screen instruction and ignore if it prompt.reboot.

HOW DO I ENABLE AERO?

You can use third party software to get AERO,
UPDATE:
For Windows 8, Win32_152815.exe reported work with 900 series chipset and able to get maximum resolution. Since Intel website always change the download page URL (like all the time) so you need to search for it (Win32_152815.exe ).

Update 2 - April 4 2014 -
I re-read all the comments from you guys and i think I have to clarify about : failed to play games after successful installation. If you manage to install using the driver I gave but getting several problems such as cannot play games which you normally play in windows XP, or have some bugs and glitch. What you can do to fix that is install your original windows XP drivers using manual installation method. Or use your Vista drivers (if available) and set compatibility mode to windows Vista.

Intel 82852/82855 GM/GME Windows 7 Driver

Update on April 17 2019 : Originally posted by lexxion on his website (currently offline). I removed download link from free file hosting site and replace with Ftp server.

Content:

  • Part 1: Drivers (32-bit and 64-bit)
  • Part 2: Uninstall current driver
  • Part 3: EDIT c:\windows\system32\drivers\vgapnp.sys
  • Part 4: EDIT c:\windows\system32\drivers\vgapnp.sys part 2
  • Part 5: Final Step
  • FIX screen Rotation

IMPORTANT!
make sure you log in to you pc as administrator/use administrator account.

PART 1: Drivers

1. Download windows XP (32-bit and 64-bit) driver:

Intel(R) Graphics Controller 6.14.10.3722 (Windows)
Download (direct link)

You can use different driver version, so far this is the best version that worked.

Update 1 : july 2016 - version  6.14.10.3722 : you can directly skip Step 1-4 and directly proceed with step 5 (extract driver file and install manually using device manager). However I do believe it might not work with certain models but worth to try.

Newer version: v6.14.10.4497 - Download
Fix resolution 1200 x 800
Able to run latest Intel Extreme 2 System Tray - as reported by anonymous
.
2. Make a new folder on you desktop and name it as Intel graphic. We will use this folder to extract the driver file.


3. Copy and paste the driver on the Intel Graphic folder you just created, right click on the Intel_6_14_10_3722.zip and select extract here, it should look like this. ( i use Winrar to extract the driver file).

.


PART 2: UNINSTALL CURRENT DRIVERS

1. (If you did not install any drivers yet, skip this part and proceed with part 3.)
We need to uninstall previous driver first. Open device manager, look for Video controller and you will see Standard VGA Driver listed. Right click on it and select uninstall and restart.

PART 3: EDIT c:\windows\system32\drivers\vgapnp.sys

1.Click 'Start' and in 'Search Box' type 'cmd'. The result will show on top. Right-click on 'cmd' and choose "Run as Administrator". If your account does not have admin rights you might be prompted to enter username and password. I used account that already has administrator privileges.


2. Then type or copy/paste the following line and press enter: 

              takeown /f c:\windows\system32\drivers\vgapnp.sys


3. IYou will see a message SUCCESS after the process finished.

4. Next type or copy and paste this line into Command Prompt (CMD):

  cacls c:\windows\system32\drivers\vgapnp.sys /G ajis:F


IMPOTANT: Replace!! ajis with your computer name. You can check your computer name by: Click start - look up on top right corner. Refer picture below:

Then press enter.


 There will be a confirmation message so type 'y'


PART 4: EDIT c:\windows\system32\drivers\vgapnp.sys


1. Open c:\windows\system32\drivers\vgapnp.sys right click and select open or open with.


 2. Choose second option "select program from a list of installed programs ".


3. Then select notepad.


4. Just add any character to the beginning of the text. Let's say we will add character x . So the text should start with xMZ and the rest of stuff. Save the file. This edit will render that file unusable.

Example before we add text it should look like this:

after adding text it should look like this


PART5: FINAL STEP

1.First open device manager by click start and  type devmgmt.msc as shown in the pictures below.


2. In Device Manager uninstall Standard VGA Adapter.


3. It will prompt you to restart so do it.

4.After install you will see a message saying that certain devices did NOT installed successfuly, which is GOOD :).

5.Go to Device Manager and you should see the exclamation point next to "video controller" and "video controller (VGA compatible)". Right-click on "video controller (VGA compatible)" and SELECT update driver.


6.Choose "Browse my computer for the Driver Software" .

7. Then select browse:


 8. Then notice that in part 1 i suggest you extract the driver in new folder (folder name: intel graphic). After click browse, point to that folder. expand by click the small arrow button until you find the win2000 folder.


9. Wait for the driver to be installed. It might hang for a little (It will say that window is "not responding"). Do not worry as this is still installing the driver. It will prompt you to restart so do it. (If it does not prompt click anywhere and wait for message). After restart it will finish installing the driver.

10. Open c:\windows\system32\drivers\vgapnp.sys in any text editor. Remove the first character you put there which was x. Save the file. it should look like this before saving it (MZ - ignore other character)


Your file will be usable again :). You can stop here if you want, but if you want to restore the permissions for the file to original state:


  1. Right-click on any other file in the c:\windows\system32\drivers. Choose "Properties". Go to "Security" tab.
  2. Now compare that security tab with the security tab of c:\windows\system32\drivers\vgapnp.sys
  3. Just make sure the security tabs of those two files look the same (all tabs and advanced options). 
  4. In order to add "TrustedInstaller" it is not the same as regular usernames because it is a service.
  5. You will need to type "NT SERVICE\TrustedInstaller" (without quotes) when adding it to own the file and to have all permissions. 
  6. Once you done editing you can delete your account from c:\windows\system32\drivers\vgapnp.sys, because it was not there from the beginning. We took control over and the previous commands added it by default..


SCREEN ROTATION FIX:
Credit: Mike

1. Open registry editor by click start and tyoe REGEDIT.EXE and press enter.
2. Look for HKEY_LOCAL_MACHINE - - SOFTWARE - - Intel - - CUI
DISPLAY1 - EnableRotation - set value to 1

Mar 31, 2018

Nvidia Geforce 7025/nforce 630a Driver windows 10 32/64-bit

Note: This instructions only for desktop PC, for notebook which uses nforce 630 (with Nvidia Geforce Go series read here: Nvidia Geforce Go 6 and 7 Series For Windows 10

Geforce 309.08 Driver originally released for Windows 7 and Windows 8 but it also worked with Windows 10. (You can also use this driver with Windows 7 and Windows 8/8.1)

1. Download and install the following drivers from nVdia.

Direct Link:
Geforce 309.08 for Windows 10 32-bit
Geforece 309.08 for Windows 10 64-bit

or Download from Nvidia Website:
http://www.nvidia.com/download/driverResults.aspx/82701/en (32-bit)
http://www.nvidia.com/download/driverResults.aspx/82760/en (64-bit)

2. After installation finish. Reboot.
3. Now you can change your resolution under display setting.

This installation is important to:

  • Get apps to work in Windows 10,
  • Get the maximum resolution and
  • Get rid of Microsoft Basic Display Adapter with limited graphic performance.

Problem with Windows 10 Fall Creations Update:
It was reported that Windows 10 Creation Updates caused BSOD/Crash. It is not frequent but should be highlighted here. Before writing this post, I spent few days looking to solve Sound Blazer not working after Fall Creator updates.

Here is the lists of supported GPU:


GeForce 7 Series:
GeForce 7025 / NVIDIA nForce 630a, GeForce 7050 PV / NVIDIA nForce 630a, GeForce 7050 / NVIDIA nForce 610i, GeForce 7050 / NVIDIA nForce 630i, GeForce 7100 / NVIDIA nForce 630i, GeForce 7100 / NVIDIA nForce 620i, GeForce 7100 GS, GeForce 7150 / NVIDIA nForce 630i, GeForce 7300 SE / 7200 GS, GeForce 7300 LE, GeForce 7300 GS, GeForce 7300 GT, GeForce 7350 LE, GeForce 7500 LE, GeForce 7550 LE, GeForce 7600 LE, GeForce 7600 GS, GeForce 7600 GT, GeForce 7650 GS, GeForce 7800 GT, GeForce 7800 GS, GeForce 7800 GTX, GeForce 7800 SLI, GeForce 7900 GS, GeForce 7900 GT/GTO, GeForce 7900 GTX, GeForce 7950 GT, GeForce 7950 GX2

 GeForce 6 Series:
GeForce 6100, GeForce 6100 nForce 400, GeForce 6100 nForce 405, GeForce 6100 nForce 420, GeForce 6150, GeForce 6150 LE, GeForce 6150LE / Quadro NVS 210S , GeForce 6150SE nForce 430, GeForce 6200, GeForce 6200 A-LE, GeForce 6200 LE, GeForce 6200 TurboCache(TM), GeForce 6200SE TurboCache(TM), GeForce 6250, GeForce 6500, GeForce 6600, GeForce 6600 GT, GeForce 6600 LE, GeForce 6600 VE, GeForce 6610 XL, GeForce 6700 XL, GeForce 6800, GeForce 6800 GS, GeForce 6800 GS/XT, GeForce 6800 GT, GeForce 6800 LE, GeForce 6800 Ultra, GeForce 6800 XE, GeForce 6800 XT

Sep 27, 2014

ATI Mobility Radeon Premium Graphics Directx 11 Download

ATI Mobility Radeon Premium Graphics processor you experience the best out of Windows 7. This include Graphics for laptop, Desktop, Processor + APUs and More. You can download the latest catalyst and drivers by using AMD auto-detect tools. It will scan and provides the latest drivers you need.

Just press download to download the latest Radeon Premium Graphics Driver

Download Link : http://www2.ati.com/drivers/auto/amddriverdownloader.exe

Run the program and it will show the latest drivers. It will show you your graphics model, your Operating system and allow you to directly download by pressing the download button. You also can set the download speed by using the speed limit option.

How to Download and Install DirectX 11
First You need to check your current DirectX Version, you can do this by click start and type DXDIAG and press Enter to open DirectX Diagnostic Tools.


Here you can check your current DirectX version and normally DirectX 11 is pre-install with Windows 7 so you do not have to re-download and re-install it again. If your computer does not have DirectX 11, you can turn on Windows Update and it will automatically install the latest DirectX 11 on your system.

DirectX Standalone Installer

Sep 13, 2014

Nvidia Geforce 2 Drivers For Windows 7

Nvidia Geforce2 was classified as legacy drivers which means Nvidia will  not released Windows 7 drivers for it. But the good news is there is a workaround to use Windows XP drivers and Install it in Windows 7. You just need to download Nvidia 71.89 (WHQL Certified) and install it manually from device manager. Some of you maybe not familiar with the installation method so I here is step by step installation process:

1. First, download Nvidia drivers version 71.89 from Nvidia website:
Download Link : http://www.nvidia.com/object/winxp_2k_71.89.html

2. Then install the driver, it will resulting in error just ignore that error. The installation is just to extract the driver's file into C:\NVIDIA\Win2KXP\71.89 which we will use for the installation process.

3. Now open device manager by click start and type DEVMGMT.MSC and press enter.

4. Look for Display  Adapter, expand it by clicking the arrow and you will see your graphic listed as standard VGA (the standard VGA is the default graphics drivers installed, the name may varies depends on your current driver status).

Right click on it and select update driver


5. After that Update Driver Software,Select base on this order:
-Browse My computer for Drivers Software . (picture)
-Select let me pick from a device from my computer. (picture)
-Select Have Disk and then Select Browse

6. After click on "Browse" point to C:\NVIDIA\Win2KXP\71.89 and select nv4_disp.inf.

Select nv4_disp.inf

7. Continue with on screen instruction until installation finish and reboot.

This installation Support the following Graphics Devices:
NVIDIA GeForce2 MX/MX 400
NVIDIA GeForce2 MX 100/200
NVIDIA Quadro2 MXR/EX
NVIDIA GeForce2 Integrated GPU
NVIDIA GeForce2 GTS/GeForce2 Pro
NVIDIA GeForce2 Ti
NVIDIA GeForce2 Ultra
NVIDIA Quadro2 Pro
NVIDIA GeForce4 MX 460
NVIDIA GeForce4 MX 440
NVIDIA GeForce4 MX 420
NVIDIA GeForce4 MX 440-SE
NVIDIA Quadro4 550 XGL
NVIDIA Quadro NVS
NVIDIA GeForce4 MX 440 with AGP8X
NVIDIA GeForce4 MX 440SE with AGP8X
NVIDIA GeForce4 MX 4000
The list is very long, so you can check all supported devices on the inf file.

Is there any other drivers I can use?
Yes, basically you can try with your original Windows XP Drivers or Other version released by Nvidia. This drivers I posted here is the most stable driver version I found so far. In some cases the original windows XP drivers provided by your PC manufacturer is better than this version. If you have problem after using this drivers like frequent shut down or unable to play games, just try with different version, it is recommended to look for version 81.XX and below (older).

How do I enable AERO?
Note that Geforce 2 is a legacy and XPDM drivers, there is no WDDM drivers for legacy Card. XPDM means the drivers unable to support AERO physically and just provide basic display like Windows XP. So to get AERO just download true transparency software (just google it) and you will get that glass look.

Aug 9, 2014

Intel 82830M Graphics Drivers Installation For Windows 7

There is no driver for Windows 7 released by Intel or any other 3rd party website. So, in this post I will show how to install Intel(R) 82830M driver in Windows 7.

Before start:
- If you already have any Intel Graphic extreme system tray installed,  uninstall it first.
- If you success install the driver using the method I describe below, but the driver uninstall itself after restart, disable your internet connection during the whole installation process. 
- the driver in this tutorial is from Fujitsu, you are responsible to comply with the T&C if you are using this driver for other model. The best way is to download the driver released by Intel on any website that distribute the driver. Since the download link changes, I'm unable to provide one from Intel, I only have the link from Fujitsu and Nec Versa website.

1. Download Intel driver version 6.14.10.3741, you can Google it or use the driver below:

Intel 830M/845 Graphic Drivers
File Name :ST4110,ST4120,ST4121_VIDEO_INTEL_V6.14.10.3741_XP.exe
Version 6.14.10.3741
File Size : 5MB
Description: This driver design for Intel 82830M and 82845.
Download Link From Fujitsu:Download (exe)
Download Link From Nec Versa : Download (zip)

The driver already tested on one of the Dell Machine and worked

2. Extract the driver we downloaded earlier. For this tutorial I make folder in desktop and name it as Intel and extract the driver in that folder. If you use the driver from Fujitsu, you need Winrar software to extract the driver file. Remember the path of the extracted driver folder, we will need it later.


3. Open device manager by click start and type DEVMGMT.MSC and press enter.


2. Look for Video Controller Marked with yellow, right click on it and select update driver:


3. Select Browse my computer for Driver software.

4. Click Browse and Point to the driver folder we extracted earlier.

 It is important to select the right folder so it will found the driver inf file.
Note that the driver inf  file (file that required for driver installation) is in Win2000 folder, so it is better to browse to that folder. In this example I extracted the driver file on a folder on desktop so the location will be: c:\User\YouComputerName\Desktop\Inte\ST4110,St4120.ST4121_VIDEO_INTEL_V6.14.10.3741-XP
(look at the picture below).


5. After clicking next, the installation will begin and will take few minutes to finish. Don't worry if it take too long, it is normal. After installation finish reboot your system. If it prompt to reboot, please do so.

6. After reboot, you wait until you see a pop up message "new hardware found" or "Installing device software" or similar, just click on it.


7. Wait until the round circle gone (installation finish). reboot once again. (Force reboot if windows prompt something)


8. Wait until  you see a pop-up like in step 6 and click on it.


9. Another installation will take place. Reboot once again util installation finish and reboot once again. (at first it will only show "Intel(R) 82830M Graphic Controller, but latr you will see it will install all driver component needed as you see in the picture below). One driver will not installed (see picture) but ignore it.


Now your graphic should be listed on device manager as Intel(R) 82830M Graphics Controller and this means you are successfully installed the graphic drivers.

Additional Notes:
1. What to do if the driver uninstall itself after reboot?
-Turn off Internet, try different driver version or try with your original windows XP Driver.

2. Is there any other method to install this driver, yes, there are different method availble for example you cn read it here:
http://laptop-driver.blogspot.com/2014/08/intel-82865g82845g-windows-7-drivers.html

Do let me know the results along with your notebook model, your feedback could help others.

Intel® 82865G/82845G Windows 7 Drivers

Intel stated that Intel® 82865G Graphics Controller drivers for Windows 7 is not available and discontinue the support for newer driver to be use with windows 7. However you can install it in Windows 7. Please note that the installation for the drivers varies depends on your model. I cannot tell which will work but you can try each method and see which worked for you.

1. Method 1 : Install Using Compatibility Mode.
2. Method 2 : Manual Installation.
3. Method 3 : Installing by Adding Legacy Drivers.
4. Method 4 : Installing by taking the computer system Privileges. 

For this tutorial I use Winrar software to extract the driver file.

Additional Information:
1. How to check weather my graphic driver installed or not : Read here
2. Where can I download winrar t extract the driver : Download here

Method 1. Install Using Compatibility Mode

1. Download your original windows XP or Vista driver and extract the driver file, f you don't have it just download this driver:
Download :  Dell | HP/Compaq | Acer | Lenovo |

Intel® 82865G Graphics Controller
Driver Version: 6.14.10.4656
Driver Date: 08/01/2006
Download

2. For this tutorial, we will use Driver from HP/Compaq. Note that the file name is SP31355.exe. Now extract the driver file using Winrar or 7zip software. You will get SP31355 folder.


 3. Open SP31355 folder and click right click on setup and select properties.

4. Select Compatibility tab and tick "run this program in compatibility mode for" and select Windows XP SP3. You can also test with windows XP or SP2. If you are using Windows Vista driver select Windows Vista from the list. Click apply and then OK.


5.After that, right lick on setup.exe and select run as admin to install. Reboot after installation finish.


Method 2 : Manual Installation.

1. The best drivers is to use the drivers build for Vista. Here is the version reported worked.

Intel® 82865G Graphics Controller
Driver Version: 6.14.10.4656
Driver Date: 08/01/2006
Download

Alternatively you can try with your original windows XP drivers. But try with the driver I mentioned above first. IF failed and you do not have your original XP driver. here is the download link base released by notebook manufacturer: Dell | HP/Compaq | Acer | Lenovo |

2. Download and extract the driver files. (see picture 2 in method 1)
3.  Open device manager by click start and type DEVMGMT.MSC and press enter.

4. Look at the display adapter and expand it, you should see Standard VGA listed.


5. Click, browse my computer for the driver software.

4. Click let me pick from a list of the device driver software form my computer.

5. Click have disk and click browse.
6. Select Win2000 folder and select ialmnt5.Inf and click Open (the ialmnt5.inf location may differ if you are using different driver version). There are only one inf file and it is clickcable. Just make sure it is in the extracted driver folder.


7. Click on Ialmnt5.inf and click open, and click next to begin the installation.
8. reboot after installation finish.


Method 3 : Installing by Adding Legacy Drivers.

1. Download your original Windows XP or Vista Drivers. If you don't have it just download this drivers:

Win2k_xp1410.zip, (tested and worked)
Version 14.10, 6.51MB
Download Link

or

Intel® 82865G Graphics Controller
Driver Version: 6.14.10.4656
Driver Date: 08/01/2006
Download


2. After that extract the driver file. Remember the path of the extracted driver folder, we will need it later.
3.  Open device manager by click start and type DEVMGMT.MSC and press enter. (see picture in method 2)
4. Look at the display adapter and expand it, you should see Standard VGA listed.
5. Click on Display Adapter to select it, and click on action and select Add Legacy Hardware.


4. Click Next, if you come across this screen select "Install the hardware that I manually select from a list". and If Select "show all devices" if the option available in the next screen.


5. You should arrive at this screen now, click have disk and select browse, point to the driver folder we extracted earlier. (see picture 6 in method 2)
6. Select Win2000 folder and select ialmnt5.Inf and click Open (the ialmnt5.inf location may differ if you are using different driver version).
7. Click OK, if you see a lists of graphic adapter, select the graphic adapter base on your graphic device. (A driver package normally support more than one product).
8. Click next to start installing the driver. Click on finish when done.
7. Click Close button and click yes to reboot.

Method 4 : Installing by taking the computer system Privileges.  

I already write a details post about this method where you can read it here. You can use this driver (Download) or directly use the driver I provided in the post : read it here:
http://laptop-driver.blogspot.com/2010/01/intel-8285282855-gmgme-windows-7-driver.html

Notes:
1. If you manage to install it, do let everyone know your model and which method and what driver version you use.
2. You suggestion are most welcome.
3. Any additional information to improve this post would be a great help.
4. Do let me know if you have problem with the installation.

Is there any other driver version, yes just read it here and use  the driver I provided in that post. Even the post is about different Intel graphic but it also contain drivers for 865 and 845 graphic.
Intel 915 graphic fro windows 7 (manual Installation)

Please read all t&c and do this at your own risk.